Festival Essentials: Delectable 2-Step Candy Apples
Are you searching for the ultimate festival essentials treat that will have everyone talking? These candy apples are not only incredibly delicious but also a fun, portable dessert that’s perfect for any outdoor event. Have you ever wondered how to make candy apples that are both visually stunning and taste amazing?
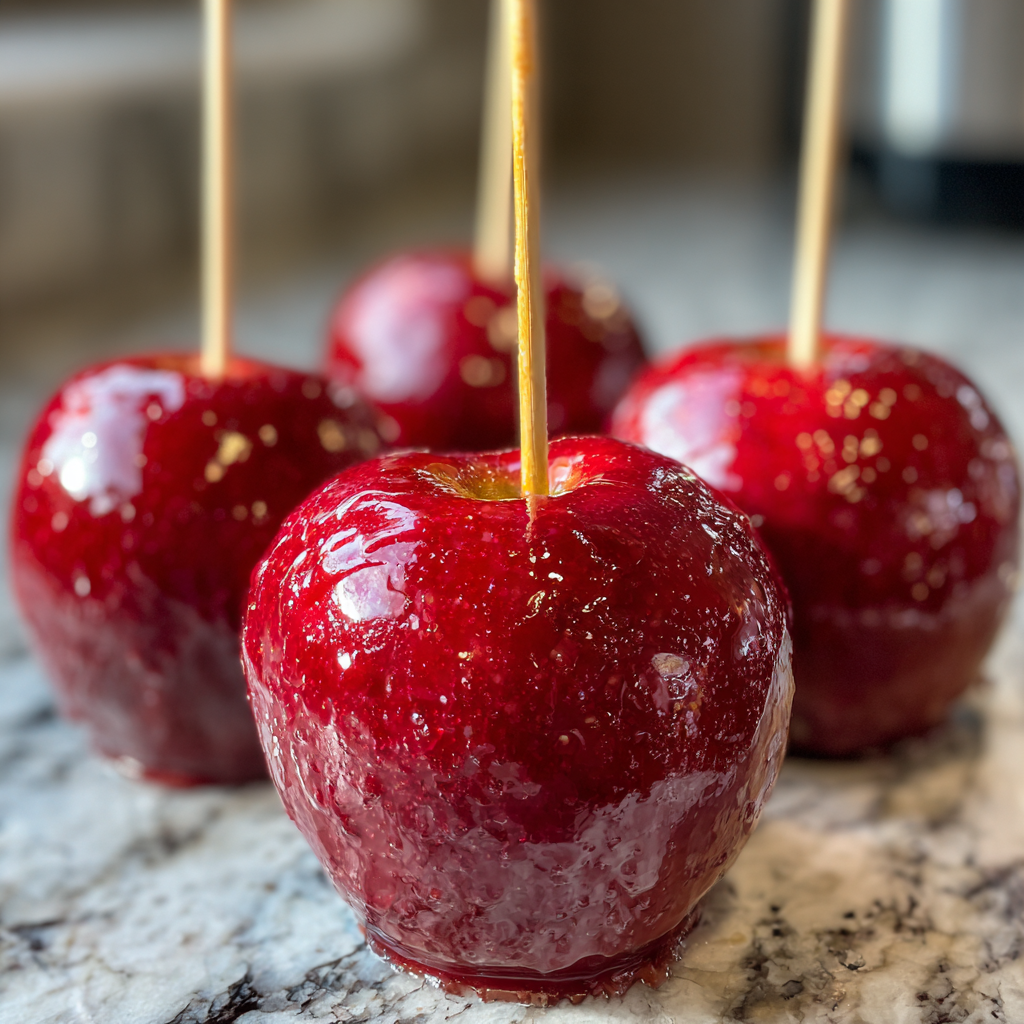
Imagine biting into a crisp, juicy apple encased in a shimmering, hard candy shell. The sweet, fruity aroma fills the air as the vibrant red color catches your eye. The crunchy texture gives way to the soft apple beneath, creating a symphony of flavors and sensations that’s simply irresistible. Moreover, these candy apples are a delightful treat that brings joy to both young and old.
Besides the sheer delight they offer, apples themselves are packed with numerous health benefits. They are a great source of dietary fiber, which aids in digestion and helps maintain healthy cholesterol levels. As a result, enjoying a candy apple means you’re also getting a dose of essential nutrients.
Apples are rich in Vitamin C, an antioxidant that supports the immune system and helps protect against cell damage. They also contain potassium, which is vital for maintaining healthy blood pressure. In addition, apples provide quercetin, a flavonoid with anti-inflammatory and antioxidant properties.
Furthermore, the candy coating, while primarily sugar, can be enhanced with ingredients like cinnamon or nuts, adding extra flavor and potential health benefits. Did you know that cinnamon has been shown to help regulate blood sugar levels? Therefore, a sprinkle of cinnamon on your candy apples can add a touch of goodness.
This particular recipe stands out because it uses a simple, two-step process that guarantees a flawless candy coating every time. Unlike some recipes that can be finicky and prone to crystallization, this method ensures a smooth, glossy finish. Moreover, the addition of a secret ingredient—a touch of lemon juice—enhances the flavor and prevents the candy from becoming too sweet.
What makes these candy apples unique is the combination of traditional techniques with modern flavor enhancements. This recipe has been a hit at family gatherings and local festivals alike, proving its reliability and crowd-pleasing appeal. Best of all, even beginner cooks can achieve professional-looking results with this easy-to-follow guide.
These festival essentials candy apples require just 20 minutes of prep time and 30 minutes of cook time, yielding 6 servings. The skill level is beginner, making it perfect for weeknight treats, meal prep for events, or impressing guests.
What are Candy Apples?
Candy apples, also known as toffee apples, are a classic confection consisting of an apple coated in a hard sugar candy shell. They are a popular treat, especially during autumn festivals and holidays. Moreover, they are enjoyed for their sweet, crunchy exterior and the juicy, tart apple inside.
Why You Will Love This Recipe
- The two-step process ensures a perfectly smooth and glossy candy coating.
- The touch of lemon juice balances the sweetness and enhances the apple flavor.
- This recipe is easy to follow, even for beginner cooks.
- They are a fun and festive treat that’s perfect for any occasion.
- These candy apples are portable and easy to eat at festivals or events.
Ingredients You Need
- 6 medium apples: Choose firm, tart varieties like Granny Smith or Honeycrisp for the best flavor and texture.
- 2 cups granulated sugar: This provides the base for the hard candy shell.
- ½ cup water: This helps dissolve the sugar and create the syrup.
- ½ cup light corn syrup: This prevents crystallization and ensures a smooth coating.
- 1 teaspoon red food coloring: This gives the candy apples their classic vibrant color.
- 1 tablespoon lemon juice: This balances the sweetness and enhances the flavor.
- 6 wooden sticks: These are essential for holding and eating the candy apples.
How to Make Candy Apples Step by Step
- Prepare the apples: Wash and dry the apples thoroughly. Remove the stems and insert a wooden stick firmly into the core of each apple.
- Make the sugar syrup: In a heavy-bottomed saucepan, combine the sugar, water, and corn syrup. Stir until the sugar is dissolved.
- Cook the syrup: Bring the mixture to a boil over medium-high heat. Do not stir after it begins to boil. Use a candy thermometer to monitor the temperature.
Pro Tip: Achieving the correct temperature is crucial for a perfect candy coating. Aim for 300-310°F (149-154°C), which is the hard-crack stage.
- Add color and flavor: Once the syrup reaches the hard-crack stage, remove it from the heat. Stir in the red food coloring and lemon juice. Be careful, as the mixture will bubble.
- Dip the apples: Working quickly, dip each apple into the hot candy syrup, rotating to coat evenly. Lift the apple and allow any excess syrup to drip off.
- Cool the apples: Place the dipped apples on a parchment-lined baking sheet to cool and harden.
- Enjoy: Once the candy coating has hardened, the candy apples are ready to enjoy!
Expert Tips for Best Results
- Use a candy thermometer to ensure the syrup reaches the correct temperature.
- Do not stir the syrup after it begins to boil to prevent crystallization.
- Work quickly when dipping the apples, as the syrup will start to harden as it cools.
- Tilt the saucepan when dipping to make it easier to coat the apples evenly.
- If the syrup becomes too thick, gently reheat it over low heat.
- For a smoother coating, ensure the apples are completely dry before dipping.
Variations and Substitutions
- Caramel Apples: Substitute the hard candy coating with a homemade caramel sauce for a softer, chewier treat.
- Nutty Apples: Dip the coated apples in chopped nuts, such as peanuts, pecans, or almonds, before the candy hardens.
- Chocolate Drizzle: Drizzle melted chocolate over the hardened candy coating for an extra layer of indulgence.
- Spiced Apples: Add a pinch of cinnamon, nutmeg, or ginger to the sugar syrup for a warm, spiced flavor.
How to Serve and Store
Serve these candy apples as a fun and festive dessert at parties, festivals, or holiday gatherings. They pair well with other sweet treats like cookies, brownies, or ice cream.
Store leftover candy apples in the refrigerator for up to 3 days. Wrap them individually in plastic wrap to prevent sticking.
Freezing is not recommended, as the candy coating may become sticky and the apple’s texture may change.
To reheat, allow the candy apples to come to room temperature before serving. The candy coating will be at its best when not overly chilled.
Frequently Asked Questions
Can I use different types of apples?
Yes, you can use different types of apples. However, firm, tart varieties like Granny Smith or Honeycrisp work best because they hold their shape well and provide a nice contrast to the sweet candy coating.
How do I prevent the candy coating from crystallizing?
Prevent crystallization by using corn syrup in the recipe and avoiding stirring the syrup after it begins to boil. These steps help maintain a smooth, glossy finish.
What is the hard-crack stage?
The hard-crack stage is a specific temperature range (300-310°F or 149-154°C) in candy making. Yes, it indicates that the sugar syrup has reached the right consistency to form a hard, brittle candy.
Can I make these ahead of time?
Yes, you can make these ahead of time. Store them in the refrigerator for up to 3 days, wrapped individually in plastic wrap to prevent sticking.
What if my candy coating is too thick?
If the candy coating is too thick, gently reheat it over low heat, stirring occasionally until it reaches the desired consistency. Be careful not to overheat it.
Can I add nuts or other toppings?
Yes, you can add nuts or other toppings. Dip the coated apples in chopped nuts, sprinkles, or other desired toppings before the candy coating hardens for the best results.
In conclusion, these festival essentials candy apples are a delightful treat that’s perfect for any occasion. They are easy to make, visually appealing, and incredibly delicious. Try this recipe today and leave a comment below!
Print
Festival Essentials: Delectable 2-Step Candy Apples
Description
Dieses kandierte Apfelrezept liefert Ihnen eine perfekt glänzende, hart knackende Zuckerglasur, die beim ersten Biss sauber zerbricht – jedes Mal. Hergestellt mit nur 5 Zutaten aus dem Vorratsschrank und in 30 Minuten zubereitet, wecken diese klassischen hausgemachten kandierten Äpfel jede Karnevals- und Halloween-Erinnerung, die Sie haben. Keine klebrige Beschichtung, kein trübes Finish, kein Rätselraten – nur das Echte, direkt in Ihrer Küche zubereitet. Das Geheimnis ist eine Zahl: 149°C. Erreichen Sie diese Temperatur und Sie können nicht scheitern.
Ingredients
- 6 mittelgroße Äpfel, feste Sorte – Granny Smith (säuerlich) oder Fuji (süß) dringend empfohlen
- 2 Tassen (400 g) Kristallzucker
- 1/2 Tasse (120 ml) heller Maissirup
- 3/4 Tasse (180 ml) Wasser
- 1/2 Teelöffel rote Gelfarbstoff (Gel ergibt eine tiefere Farbe als Flüssigkeit)
- 1/2 Teelöffel Zimtextrakt oder Aromaöl (optional)
- 6 Holzstiele für kandierte Äpfel oder stabile Lutscherstiele
- Antihaft-Kochspray
- Backpapier oder Silikonbackmatte
Instructions
- Richten Sie Ihren Arbeitsplatz ein, bevor Sie beginnen: Legen Sie ein Backblech mit Backpapier aus und sprühen Sie es leicht mit Antihaft-Kochspray ein. Halten Sie Ihre Äpfel am Stiel bereit und in Reichweite. Sobald der Zucker die Temperatur erreicht hat, müssen Sie sich schnell bewegen – Vorbereitung ist alles.
- Entfernen Sie das gesamte Wachs von Ihren Äpfeln. Gekaufte Äpfel haben eine lebensmittelechte Wachsschicht, die verhindert, dass die Süßigkeit klebt, und Blasen verursacht. Tauchen Sie jeden Apfel 5 Sekunden lang in kochendes Wasser und schrubben Sie ihn dann mit einem rauen Küchentuch trocken. Stecken Sie einen Holzstiel fest in das Stielende jedes Apfels und schieben Sie ihn mindestens bis zur Hälfte durch. Auf Ihrem vorbereiteten Backblech beiseite stellen.
- Zucker, Maissirup und Wasser in einem schweren mittelgroßen Topf verrühren. Nur so lange vorsichtig umrühren, bis der Zucker feucht ist. Befestigen Sie ein Zuckerthermometer an der Seite des Topfes und stellen Sie sicher, dass die Spitze in die Mischung eingetaucht ist, aber nicht den Boden des Topfes berührt – eine ungenaue Messung ruiniert die Beschichtung.
- Den Topf bei mittlerer bis hoher Hitze auf den Herd stellen. Die Mischung ohne Rühren zum vollen Aufkochen bringen. Sobald es kocht, verwenden Sie einen feuchten Gebäckpinsel, um Zuckerkristalle abzuwischen, die an den Seiten des Topfes haften – alle Kristalle, die wieder hineinfallen, können dazu führen, dass die gesamte Charge kristallisiert.
- Weiterkochen, ohne zu rühren, bis das Zuckerthermometer zwischen 149°C und 154°C anzeigt – dies ist das Hartbruchstadium. Dies dauert ca. 15 bis 20 Minuten. Die Temperatur steigt zuerst langsam an und beschleunigt sich dann am Ende dramatisch. Verlassen Sie den Herd in den letzten 5 Minuten nicht.
- Nehmen Sie den Topf sofort vom Herd, sobald er 149°C erreicht hat. Rühren Sie den Gelfarbstoff und den Zimtextrakt ein, falls Sie ihn verwenden. Nicht zu viel rühren – ein paar sanfte Drehungen reichen aus. Jetzt warten. Lassen Sie alle Blasen vollständig abklingen, ca. 1 bis 2 Minuten. Das Eintauchen in einen schäumenden Sirup hinterlässt eine strukturierte, ungleichmäßige Beschichtung auf Ihren Äpfeln.
- Neigen Sie den Topf zu einer Seite, sodass sich der Sirup tief in einer Ecke ansammelt – dies erleichtert die vollständige Abdeckung. Arbeiten Sie jeweils mit einem Apfel und tauchen und drehen Sie jeden Apfel, um ihn vollständig zu bedecken, und lassen Sie den Überschuss 3 bis 4 Sekunden lang wieder in den Topf tropfen. Legen Sie jeden beschichteten Apfel mit dem Stiel nach oben auf das vorbereitete Backblech. Berühren oder bewegen Sie die Äpfel nicht, während sie fest werden. Vor dem Servieren mindestens 20 Minuten bei Raumtemperatur vollständig abkühlen lassen. Die Beschichtung härtet zu einem glasartigen Finish aus.
Notes
- Warum ist meine kandierte Apfelbeschichtung klebrig oder zäh? Der Sirup hat nicht 149°C (Hartbruchstadium) erreicht. Selbst ein paar Grad zu wenig – bei 143°C oder 146°C – hinterlassen zu viel Wasser im Zucker, was zu einer weichen, taffyartigen Textur anstelle einer harten Schale führt. Verwenden Sie immer ein kalibriertes Zuckerthermometer und nehmen Sie es nicht frühzeitig vom Herd.
- Warum ist meine kandierte Apfelbeschichtung trüb oder voller Blasen? Sie haben sie eingetaucht, bevor sich die Blasen nach dem Hinzufügen des Farbstoffs vollständig gesetzt haben. Warten Sie immer 1 bis 2 volle Minuten nach dem Herausnehmen vom Herd, bis die Oberfläche vollständig ruhig und glänzend ist, bevor Sie sie eintauchen.
- Warum haftet die Beschichtung nicht an meinem Apfel? Die Apfeloberfläche war noch wachsig oder leicht feucht. Wachs und Wasser verhindern die Zuckerhaftung. Entfernen Sie Wachs mit einem 5-Sekunden-Tauchbad in kochendem Wasser und trocknen Sie es dann vor dem Eintauchen vollständig mit einem rauen Tuch ab.
- Kandierte Äpfel niemals kühlen. Kalte Luft und Feuchtigkeit führen dazu, dass die harte Zuckerbeschichtung Feuchtigkeit aufnimmt und klebrig wird. Bei Raumtemperatur, unbedeckt oder locker verpackt lagern und für die beste Textur innerhalb von 1 bis 2 Tagen verzehren.
- Wenn der Sirup beim Eintauchen zu stark eindickt, stellen Sie den Topf 20 bis 30 Sekunden lang bei schwacher Hitze auf den Herd, um ihn zu lösen. Fügen Sie kein Wasser hinzu.
- So stellen Sie kandierte Äpfel ohne Maissirup her: Ersetzen Sie ihn durch 1 Teelöffel weißen Essig oder frischen Zitronensaft. Dies verhindert die Zuckerkristallisation auf die gleiche Weise wie Maissirup.
- Für Halloween-Kandierte Äpfel: Tauschen Sie roten Gelfarbstoff gegen schwarzen, tiefvioletten oder waldgrünen aus, um ein gruseliges, dramatisches Finish zu erzielen. Schwarze Lebensmittelfarbe funktioniert am besten mit extra-schwarzem Gel, nicht mit normalem Schwarz.
- Bester Tag, um kandierte Äpfel herzustellen: ein kühler, trockener Tag mit niedriger Luftfeuchtigkeit. An feuchten Tagen bleibt die Beschichtung auch nach dem vollständigen Abkühlen klebrig. Vermeiden Sie es, diese an regnerischen Tagen oder in einer dampfenden Küche herzustellen.
- Die Apfelsorte ist wichtig: Granny Smith sorgt für einen säuerlich-süßen Kontrast, der die Zuckerbeschichtung durchbricht. Fuji und Honeycrisp sind süßer und ebenso fest. Vermeiden Sie weiche Sorten wie McIntosh oder Red Delicious – sie werden unter dem heißen Zucker matschig.
Nutrition
- Serving Size: 1 kandierter Apfel
- Calories: 271
- Sugar: 65
- Sodium: 3
- Fat: 1
- Saturated Fat: 0
- Unsaturated Fat: 1
- Trans Fat: 0
- Carbohydrates: 71
- Fiber: 4
- Protein: 1
- Cholesterol: 0
Keywords: Kandierte Apfelrezept, hausgemachte kandierte Äpfel, einfaches kandiertes Apfelrezept, Halloween-Kandierte Äpfel, kandierter Apfel ohne Maissirup, hart knackende kandierte Äpfel, glänzende kandierte Äpfel, kandierte Äpfel von Grund auf, Herbst-Kandierte Apfelrezept, Karnevals-Kandierte Äpfel, wie man kandierte Äpfel macht, Tipps für kandierte Äpfel, klebrige kandierte Apfelreparatur, beste Äpfel für kandierte Äpfel, Festival Essentials