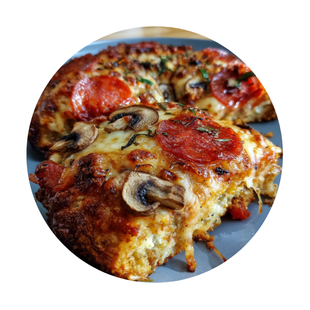

Oh, these Mini-Margherita-Pizzen! They’re my go-to when I want something quick, delicious, and just a little bit fancy—without the fuss. Picture this: golden, crispy edges, stretchy mozzarella, and that fresh basil aroma filling your kitchen. It’s like a tiny vacation to Italy, right from your oven. I stumbled upon this recipe years ago when my niece demanded “mini pizzas” for her birthday party. After some trial and error (and a few overly crispy batches), I nailed it. Now? They’re a staple in our house—perfect for snacks, lunches, or even a fun dinner with friends. The best part? You probably have most ingredients already. Let’s get baking!
Ingredients for Mini-Margherita-Pizzen
Trust me, the magic of these little pizzas starts with simple, fresh ingredients. I’ve learned over the years that quality matters—especially when you’re working with just a few components. Here’s what you’ll need to make about 6 perfect Mini-Margherita-Pizzen:
Teig
The dough is where it all begins. My secret? A touch of sugar to wake up the yeast and just enough olive oil for that perfect chew. You’ll need:
- 200g Mehl (I prefer Tipo 00 for authenticity, but all-purpose works too)
- 1 Tasse lauwarmes Wasser (baby-bottle warm, about 40°C)
- 1 Packung Trockenhefe (7g, the little paper packets)
- 2 EL Olivenöl (extra virgin for flavor)
- 1/2 TL Salz
- 2 EL Zucker (helps the yeast do its thing)
Pro tip: Let this mixture sit for 10 minutes after combining—you’ll see tiny bubbles forming. That’s your yeast saying “Hello, let’s make pizza!”
Belag
Here’s where we keep it classic Margherita—simple but vibrant. Don’t skimp on quality here:
- 100ml Tomatensauce (I use Mutti brand or my own simple simmered sauce)
- 100g Mozzarella-Käse (fresh, in water—drained and torn by hand)
- 5 Basilikumblätter (torn right before baking for maximum aroma)
- 1 EL Olivenöl zum Bestreichen (that golden finish makes all the difference)
See? Nothing fancy, but when these ingredients come together… wow. Just wait till you smell them baking!
How to Make Mini-Margherita-Pizzen
Alright, let’s roll up our sleeves and make these adorable little pizzas! I promise it’s easier than you think—follow these steps, and you’ll have perfect Mini-Margherita-Pizzen in no time. Just don’t blame me if you end up eating them all straight off the baking sheet!
Teig vorbereiten
First things first: the dough! Combine your flour, water, yeast, olive oil, salt, and sugar in a big bowl. Now, here’s my trick—mix it with a wooden spoon first, then get your hands in there. Knead for about 5 minutes until it’s smooth and slightly sticky. No need to overdo it; we’re not making bread here!
Cover the bowl with a damp kitchen towel and let it rest for 10 minutes. This lets the gluten relax so it’ll be easier to roll out. You’ll notice it puff up just a tiny bit—that’s your yeast working its magic.
Once rested, dust your counter with flour and roll the dough out to about 1/4-inch thickness. Use a round cookie cutter (or an upside-down glass) to cut out 6 little circles. Don’t worry if they’re not perfect—rustic is charming!
Pizzen belegen
Now the fun part! Place your dough circles on a parchment-lined baking sheet. Spread about a tablespoon of tomato sauce on each one—leave a tiny border for that classic pizza crust. Pro tip: use the back of a spoon to spread it evenly without tearing the dough.
Tear your mozzarella into small pieces and scatter them over the sauce. Less is more here—too much cheese, and they’ll turn into a melty mess. Finally, tear your fresh basil leaves and tuck a few pieces onto each pizza. Drizzle lightly with olive oil—this gives them that gorgeous golden finish.
Backen
Pop them into a preheated oven at 200°C (that’s about 390°F for my American friends). Bake for 8-10 minutes—keep an eye on them after the 8-minute mark. You’re looking for bubbly cheese and lightly golden edges.
Careful—they’ll be piping hot! Let them cool for just a minute before serving. That first bite of crispy crust, gooey cheese, and fresh basil? Pure heaven. And the best part? They’re so small, no one will judge you for eating three… or four.
Tips for Perfect Mini-Margherita-Pizzen
After making these little guys countless times, I’ve picked up some tricks that take them from good to “wow!” First, if your dough feels sticky when rolling, dust your hands with flour—not the counter. This keeps the texture just right. For extra flavor, rub a cut garlic clove on the hot crust right after baking. And here’s my favorite trick: add basil after baking for vibrant color and fresh taste (the oven turns it black otherwise). Want crispier bottoms? Bake directly on the oven rack for the last 2 minutes. Oh, and always serve them warm—that stretchy cheese moment is half the fun!
Variations of Mini-Margherita-Pizzen
Once you’ve mastered the classic version, get creative with these easy twists! My kids adore “rainbow pizzas”—I swap tomato sauce for pesto and add thin slices of cherry tomatoes. For a spicy kick, sprinkle chili flakes before baking or drizzle with hot honey after. Out of mozzarella? Feta or goat cheese make deliciously tangy substitutes. In summer, I love topping them with fresh peach slices and prosciutto—sounds weird but trust me, it works! And for a gluten-free option, just use your favorite GF flour blend (add an extra egg for binding). The possibilities are endless with these little flavor canvases!
Serving Suggestions for Mini-Margherita-Pizzen
These little pizzas shine brightest when served fresh from the oven with friends! I love pairing them with a simple arugula salad—just toss the greens with lemon juice, olive oil, and shaved parmesan. For parties, arrange them on a wooden board with small bowls of garlic dip or chili oil for drizzling. Kids? They’ll happily devour them plain while still warm—the cheese pulls are half the fun!
Storing and Reheating Mini-Margherita-Pizzen
Leftovers? Ha—as if that ever happens in my house! But if you miraculously have some, here’s how to keep them tasty. Store cooled pizzas in an airtight container for up to 2 days. To reheat, pop them in a 180°C oven for 3-5 minutes—never the microwave unless you enjoy soggy crusts. Want to freeze? Layer unbaked topped pizzas between parchment paper and freeze flat. Bake straight from frozen, adding 2 extra minutes. They won’t be quite as perfect as fresh, but still delicious!
Nutritional Information for Mini-Margherita-Pizzen
Each little pizza packs about 250 calories—just enough to satisfy without guilt! They’ve got 8g protein from that lovely mozzarella, 30g carbs for energy, and 10g fat (mostly the good kind from olive oil). Remember, these numbers can change if you tweak ingredients. My advice? Enjoy them fresh and don’t stress—it’s pizza after all!
Frequently Asked Questions About Mini-Margherita-Pizzen
Can I make the dough ahead of time?
Absolutely! Prepare the dough as usual, then wrap it tightly in plastic and refrigerate for up to 24 hours. Let it sit at room temp for 30 minutes before rolling—it’ll be even more flavorful! Just don’t freeze the raw dough; it messes with the yeast.
Help—my cheese melted everywhere!
Been there! The trick is to tear mozzarella into small pieces (no thick slices!) and keep toppings minimal. If cheese still escapes, bake on parchment paper—easy cleanup. And hey, crispy cheese edges are a bonus in my book!
No fresh basil—can I use dried?
Fresh is best, but in a pinch, sprinkle a tiny bit of dried basil into the tomato sauce instead of topping. Dried herbs burn easily, so never put them directly on top before baking.
Can kids help make these?
Oh yes! My 5-year-old loves cutting dough circles (with supervision) and arranging toppings. It’s messy but makes such sweet memories. Just keep little hands away from the hot oven!
Why aren’t my pizzas crispy?
Two likely culprits: too much sauce (makes soggy crusts) or overcrowding the baking sheet. Space them out and bake in batches if needed. For extra crunch, brush edges with olive oil before baking!
Share Your Mini-Margherita-Pizzen Experience
I’d love to hear how your Mini-Margherita-Pizzen turned out! Did you stick with the classic recipe or try any fun twists? Snap a photo of those golden little beauties and tag me—I live for those cheese pull shots! Leave a comment below with your tips or questions. Happy baking, friends!
Print
6 perfekte Mini-Margherita-Pizzen – köstlich & einfach
- Total Time: 25 Minuten
- Diet: Vegetarian
Description
Kleine, handliche Margherita-Pizzen, perfekt für eine schnelle und leckere Mahlzeit.
Ingredients
- 200g Mehl
- 1 Tasse lauwarmes Wasser
- 1 Packung Trockenhefe
- 2 EL Olivenöl
- 1/2 TL Salz
- 2 EL Zucker
- 100ml Tomatensauce
- 100g Mozzarella-Käse
- 5 Basilikumblätter
- 1 EL Olivenöl zum Bestreichen
Instructions
- Mische Mehl, Wasser, Hefe, Olivenöl, Salz und Zucker in einer Schüssel.
- Lass die Mischung für 10 Minuten stehen.
- Rolle den Teig aus und schneide ihn in kleine Kreise.
- Bestreiche jeden Kreis mit Tomatensauce.
- Belege mit Mozzarella und Basilikum.
- Backe für 10 Minuten bei 200°C.
Notes
- Frischkäse kann auch verwendet werden.
- Ohne Hefe geht der Teig nicht auf.
- Länger backen macht die Pizzen härter.
- Prep Time: 15 Minuten
- Cook Time: 10 Minuten
- Category: Backen
- Method: Ofengebäck
- Cuisine: Italienisch
Keywords: Mini Margherita Pizzas, schnell, einfach, lecker